Segment Web
Getting Started
Overview
Segment is a Customer Data Platform (CDP) that collects and processes data from the users of your digital platforms and products. You can also use Segment to direct that data to other tools, making it a powerful tool for driving product experience insights with Sprig.
If your team is already leveraging Segment in your digital properties, you can use Segment to install the Sprig SDK as well as send the data Sprig needs to trigger and filter studies (like events and attributes).
This is an effective low-to-no-code option because it requires no changes to your codebase to deploy in-product Sprig studies. Even many of Sprig’s advanced features also require no changes to your codebase as long as you know what Segment functions your organization is already deploying.
Segment Actions vs Segment Classic
This install method leverages Segment Actions both to install the Sprig SDK and to send events and attributes to Sprig from Segment. In most cases, we recommend integrating Sprig with Segment Actions over Segment Classic, although certain use cases may require Segment Classic, such as passing data to Sprig from your product's backend. For more information, consult with your Segment administrator or our Segment Classic documentation.
Requirements
- You must be on Segment Analytics.js 2.0
- Join your teammates on Sprig (check with your Sprig admin whether team discovery is on, or simply have a team member invite you via your email address). This will give you access to your team’s environment IDs, as well as the interactive Installation Guide.
- You will either need to access your team’s Segment account, or work with your team’s Segment administrator.
- If you are planning to use Segment as a source for certain events and attributes, you may wish to consult with a developer on your team who has knowledge of how these events and attributes are expressed in JavaScript.
Install SDK
If you are running Segment and wish to integrate your Segment instance with Sprig, you will first need to follow these steps to install the Sprig SDK.
Obtain a Sprig Environment ID
Sprig provides two environments, Development and Production, each with its own corresponding ENVIRONMENT_ID (which can be found in Integrations > Segment Web).
The Development environment is recommended for initially setting up and verifying your installation. Then, you can use the Production environment to deploy studies to real users.
Set up Sprig as a Segment Destination
In Segment, you will be connecting your digital platform or product as a Source to Sprig as a Destination. This will both install the Sprig SDK in your digital platform and allow events and attributes to be passed back to Sprig for the purpose of triggering and filtering studies.
To do this, follow these steps (or follow this video):
- In Segment, click Connections, then click Destinations.
- Search for “Sprig” and select the Sprig destination.
- Click Configure Sprig.
- Select your data source (e.g. your website or app).
- Enter an identifiable destination name and ensure Actions is selected.
- Copy your Environment ID from your Sprig Dashboard and paste it into the Environment ID field.
- Turn on Enable Destination and save your changes.
That’s it! As well as the Sprig SDK, your events, attributes and other user data (e.g. userIDs) are automatically configured to be forwarded to Sprig. (See the Mappings tab for more details)
Verify Installation
To verify your Sprig installation, go to your Segment-enabled product and “hard refresh” the page to ensure the Segment destinations are updated. Next, open the console by holding Control+Shift+I on Chrome for Windows or Option+Command+I on Chrome and Safari for Mac, clicking on the Console tab. Once there, execute either or both of the following commands:
- Type
Sprig._segment. If the value 1 is returned, Sprig has been successfully installed via Segment. - Retrieve your Sprig visitor ID with
Sprig.visitorId. This is the unique ID assigned by Sprig to visitors loading the SDK, so the value that is returned indicates Sprig is installed. You can then add this value to the following URL to view your activity in the Sprig Users page:https://app.sprig.com/users/<PASTE_YOUR_VISITOR_ID_HERE>
For the following sections on identifying users and tracking events, you will need to ensure your Sprig Mappings are enabled in Segment. These are enabled by default, but if you want to review these settings in Segment, go to Destinations > Sprig > Mappings > Edit Mapping.
Identify Users
Each time a user is tracked by Sprig on a webpage with the SDK installed, they are assigned a unique visitor ID in Sprig that allows users to be targeted with studies when they perform specified behaviors.
While this is a requirement for targeting users with Sprig studies, these are still considered unauthenticated users until their Sprig visitor IDs are coupled with the unique USER_IDs assigned to users within your platform’s internal authentication framework.
We recommend that you follow this best practice when installing Sprig:
- This ensures consistency between the visitor IDs generated by Sprig and the ones in your internal database, product analytics/CDP, or data warehouse, allowing more effective targeting of studies.
- Your users have a consistent experience across platforms, and do not see the same study multiple times.
- It also optimizes the number of Monthly Tracked Users (MTUs) sent to Sprig, which impacts your billing.
If necessary, you can also use an anonymizing function or hash.
A good User ID is:
- Unique: Two users should not share the same User ID.
- Mappable: User IDs sent to Sprig should map back to your internal User IDs, either directly or anonymously.
- Static: Once assigned, a User ID should not change.
Once you've configured Sprig as a Segment destination above, users tracked from Segment's Identify method will be sent into Sprig. If you want to test user identification, open the web page or app in your browser and run this command in your web console:
analytics.identify('userId123', {
  firstName: 'James',
  lastName: 'Gibbon'
});
In Segment, go to the corresponding source and click Debugger. You should see something similar to the following:

Once Identify events are being triggered in your users' browsers and successfully forwarded to Sprig, you can view visitors being created on your Sprig Users dashboard. You'll be able to see visitor emails if being set, and when clicking on a specific visitor, you'll be able to see their User ID and any attributes set for them.
Logout
When a user logs out of your webpage, make sure to log out of Sprig. This will prevent new activity from being associated with an incorrect user. Note that if you call analytics.track("SOME_EVENT") on an unauthenticated user, Sprig will assign them a new profile and count this new user separately toward your MTU limit.
analytics.track("Signed Out")
Logging out your users correctly
You must make the above call to log out your users and accurately track users in Sprig. Existing calls to Segment's
analytics.reset()in your codebase will log the user out of Segment but not out of Sprig, creating discrepancies in your data if an accompanying"Signed Out"event is not tracked.
Track Events
If you are already leveraging Segment's Track method, your events in Segment will automatically be passed to Sprig, and you do not need to do additional work.
Sprig uses events to trigger (display) studies after the user performs a specific action. They can also be used as a filter to target users who have previously performed an action.
If you want to test that events are passing from your source to Sprig through Segment, you can follow a similar process as testing that you are identifying users. In the console, copy and paste the following script to stage a mock event:
analytics.track('Clicked Button', {
  plan: "Pro Annual",
  accountType: "Wick"
})
Now, go to your source site or app's Debugger page on Segment, and check to see if it has registered the Clicked Button event. If it appears here, in Sprig's Events page, you will also see a banner showing that you have an event request to review. Click Manage Requests to see the event.
No-Code Events
No-Code events let teammates without access to the codebase or to Segment create events in Sprig based on the page’s URL, HTML elements, or CSS, which can then be used to trigger or filter Web studies. No-Code events tend to be used to define more straightforward user actions, like viewing a page or clicking a button. For more information, see No-Code events.
Track Attributes
If you are already leveraging traits in Segment, your traits in Segment will automatically be passed to Sprig (as Attributes), and you do not need to do additional work.
Sprig allows you to track attributes, which can provide more context about the user to help you better understand their feedback. You can also use these attributes to filter your audience and target specific kinds of users. Some example attributes that can be tracked are:
- Plan type
- Super users / power users
- Company
A user’s attributes can be seen on their profile in the Users page, and are recorded and attached to any surveys response they submit. For more information, see Attributes.
In Segment, the equivalent of attributes are traits, and these are treated as a subset of the Identify spec.
Filter Attributes through Segment
Segment offers the ability to define rules, so that only a subset of your data can be automatically sent to Sprig, through Destination Filters. This is often used for limiting which PII is sent to Sprig, and does not require any additional engineering work to implement.
The ability to use Destination filters within Segment, for reducing the scope of which data is sent to Sprig, is currently limited to Segment Business Tier customers.
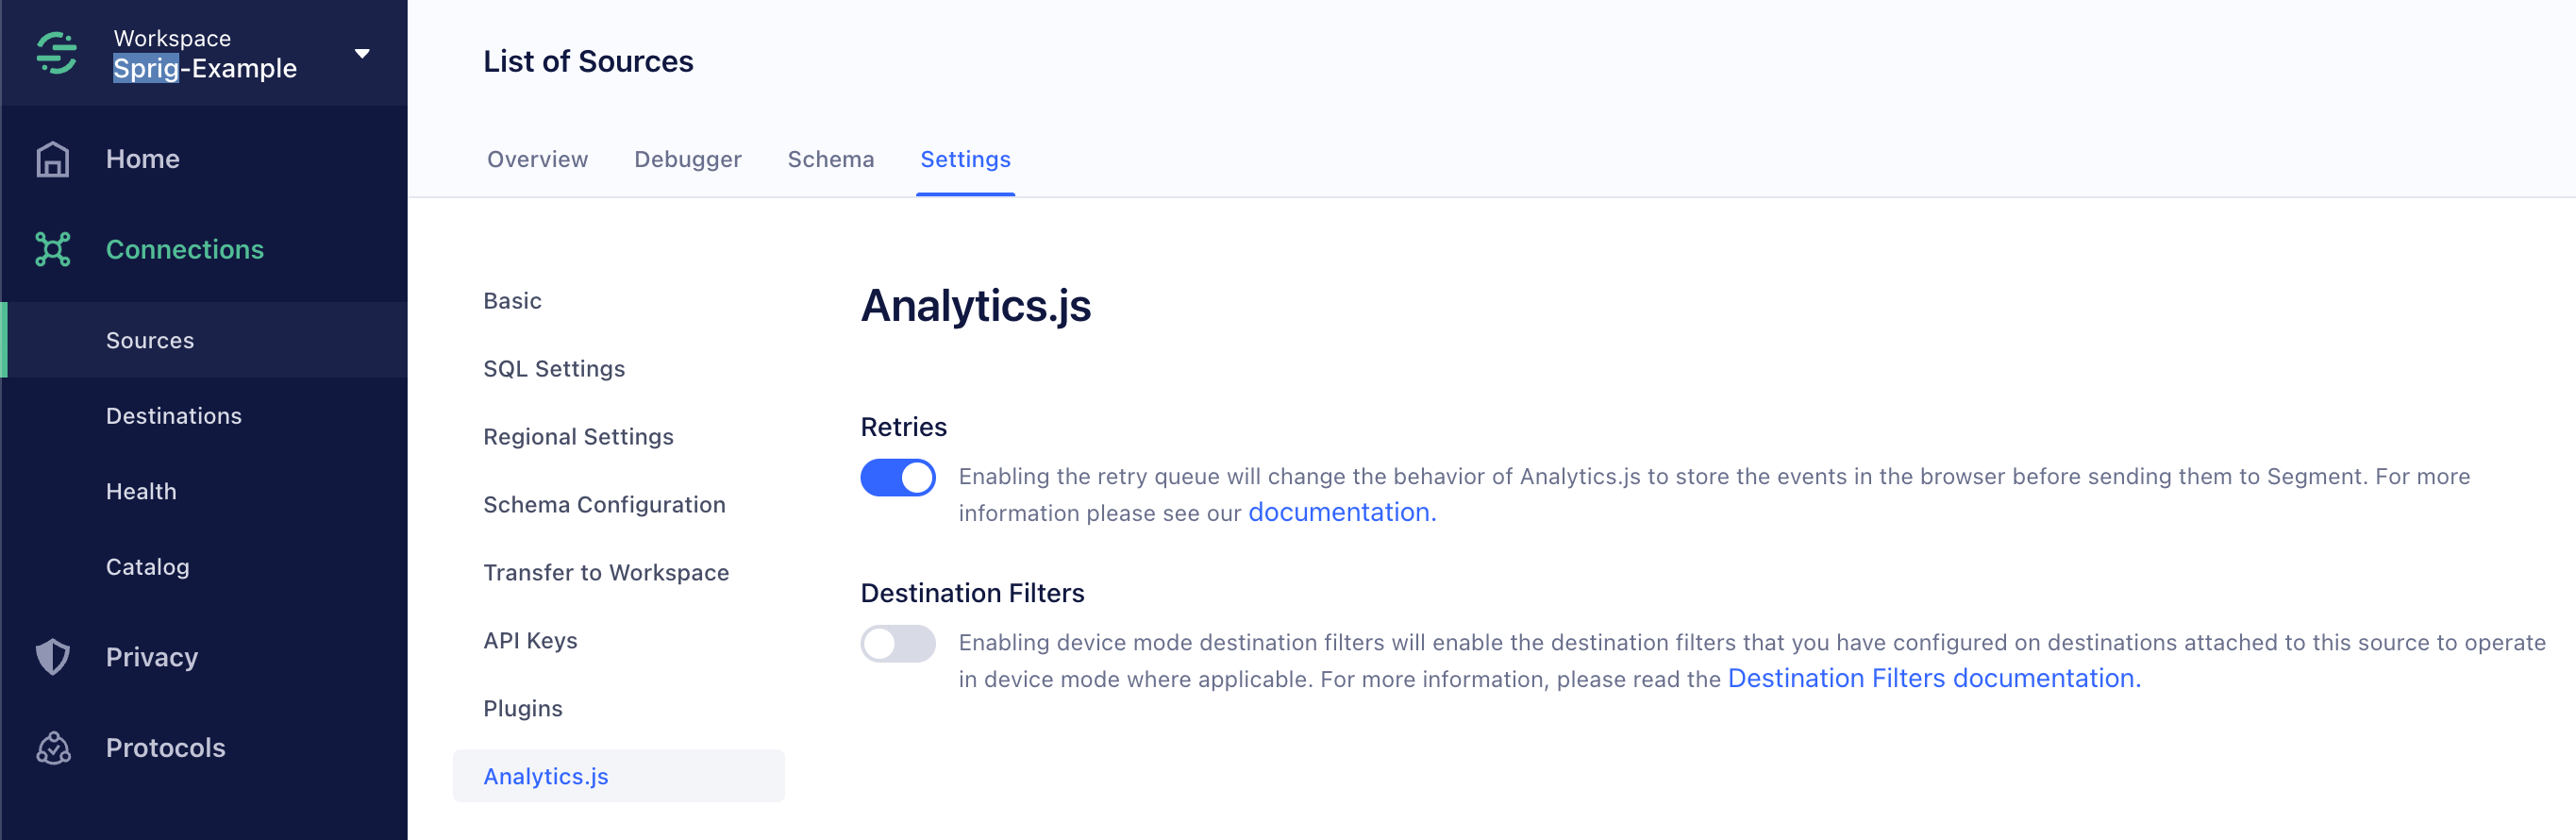
Enable Destination Filters for your Segment Source
As part of the Segment Data Source you are using, you will need to ensure that the ability to use Destination Filters is enabled, under Settings > Analytics.js and toggling the Destination Filters setting on:
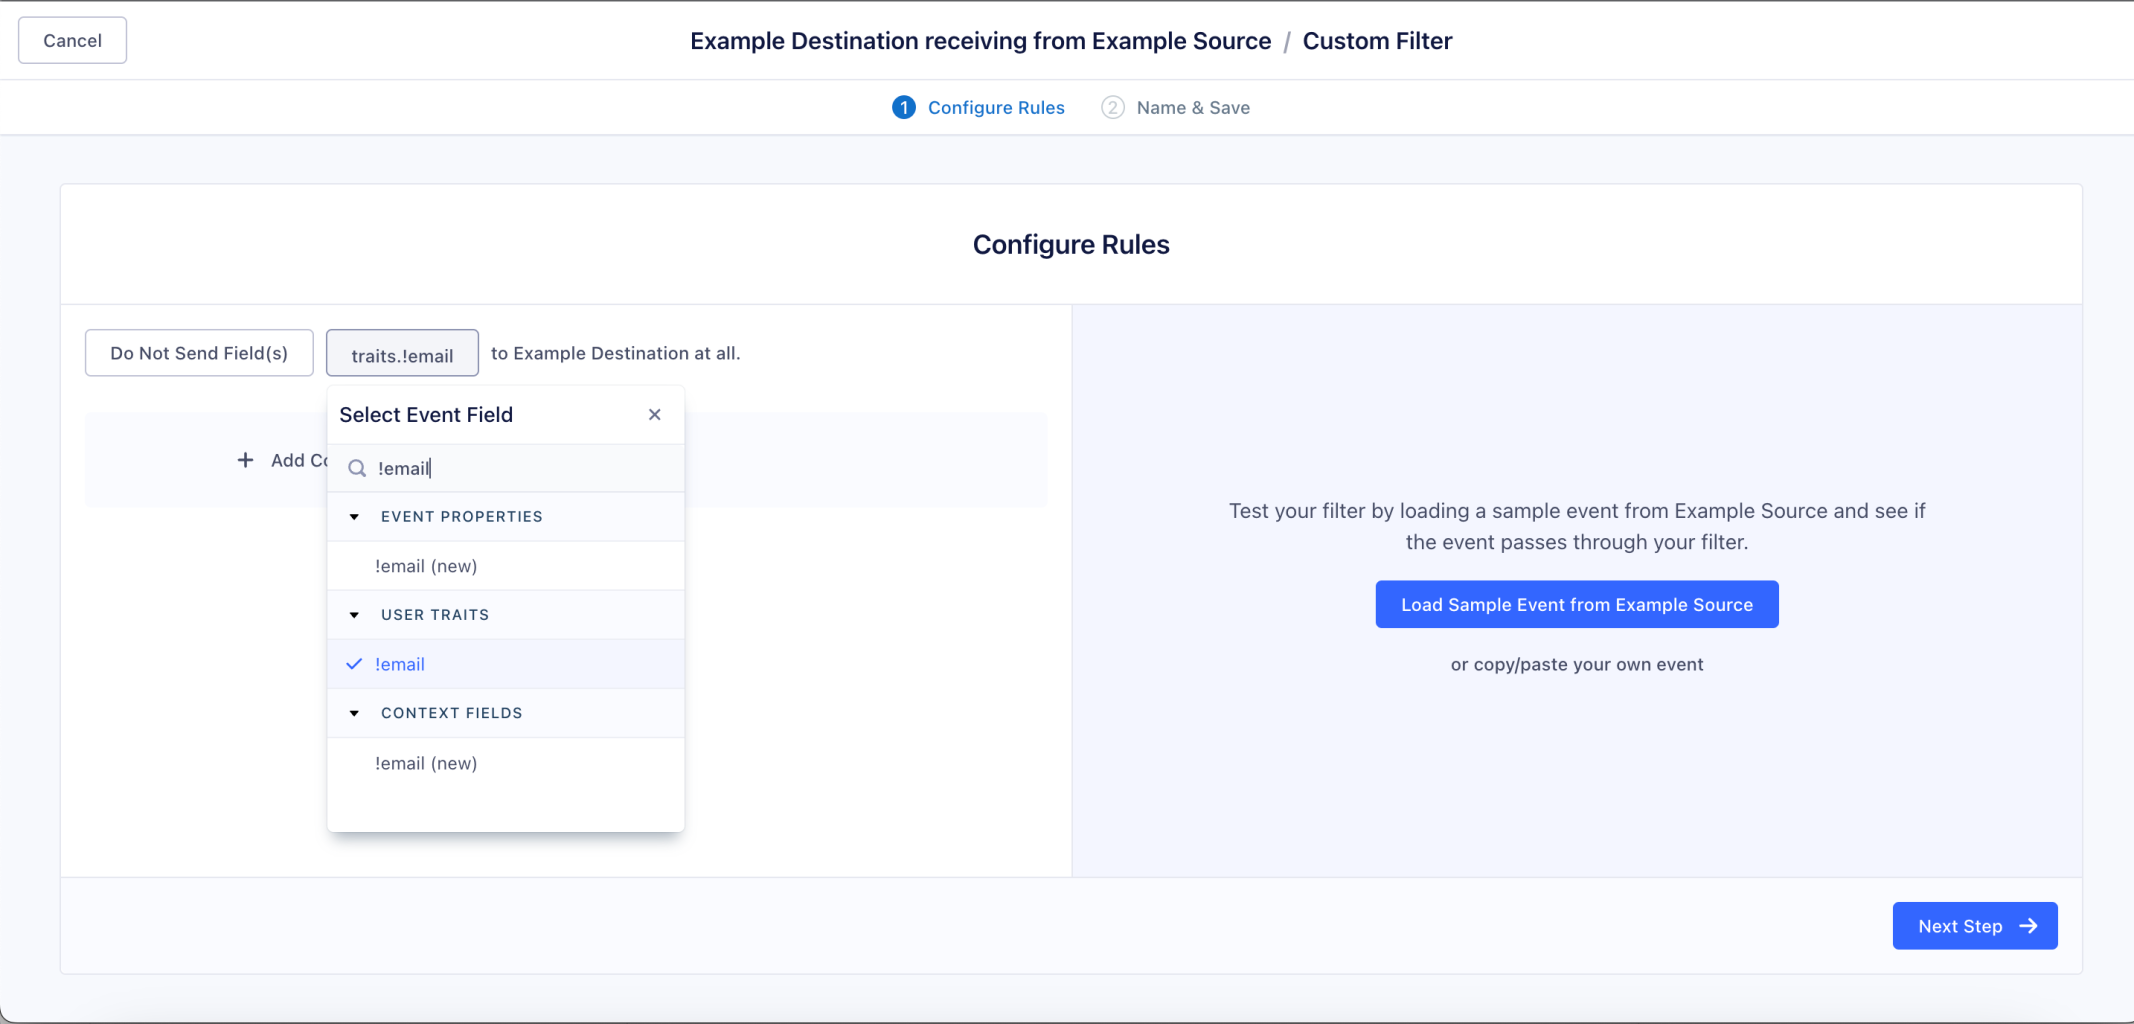
Create the Destination Filter on your Segment Destination
As part of your Sprig destination within Segment, you'll now need to create the filter. In the example below, we can define certain traits that should not be sent to Sprig, such as the !email associated with this visitor:
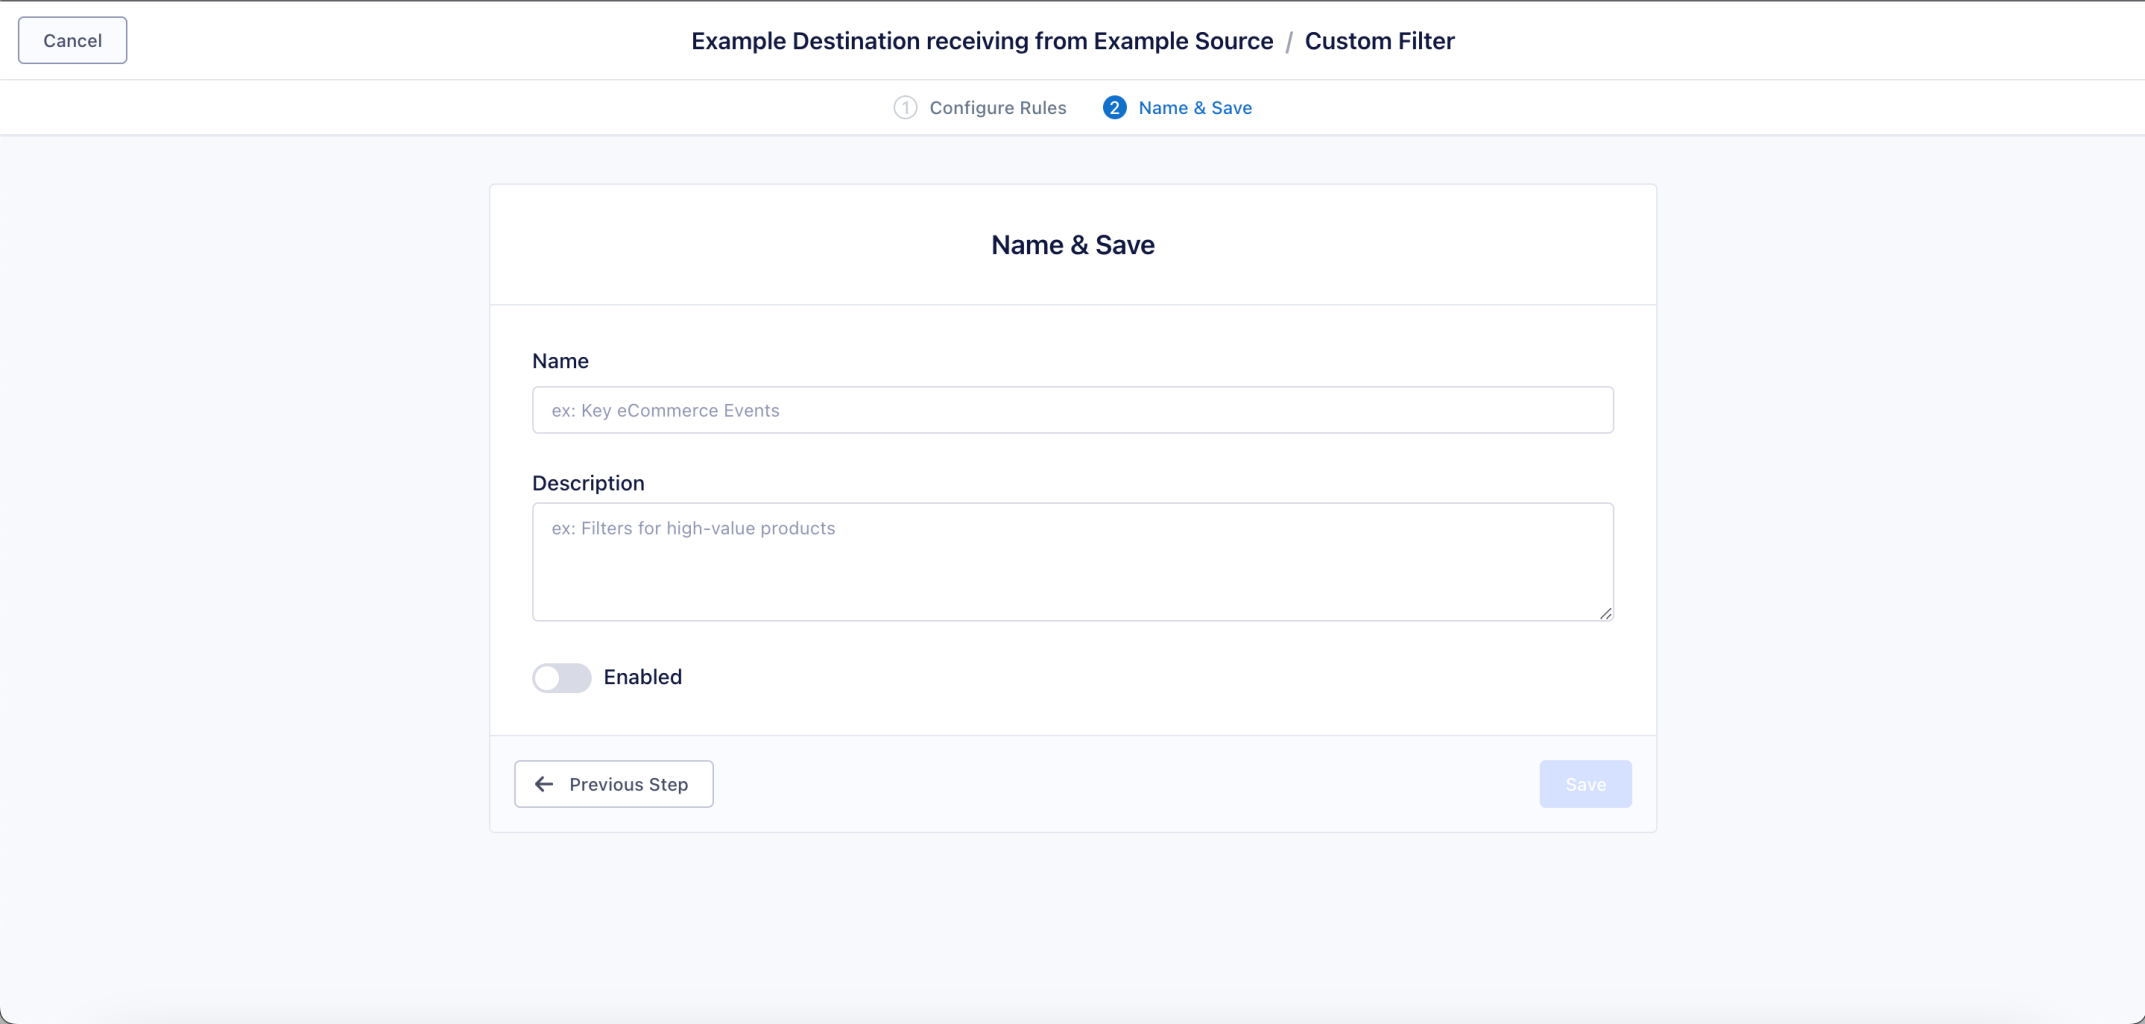
Once your conditions have been set, you will then need to name your filter and save it.
Screen Calls (Mobile)
Segment allows clients to take advantage of Screen calls, which allow you to record whenever a user sees a Screen, which is the mobile app equivalent of a Page in Segment. Screen calls tracked via Segment’s Screen method can be used in Sprig to trigger a Code Event when building out a Study’s targeted audience. For example, if there are specific user interactions in your mobile app that you would like to tie to a Study in Sprig, you can use an attribute in your Segment Screen call to trigger your Sprig Study.
Test & Deploy
To confirm everything is working as expected with survey delivery, you can create a survey and manually trigger delivery from the Developer Console.
- You'll first need to create a Study and set the delivery method to Web. If you're testing in the Development environment, you'll need to create the Study in Development.
- In the Sprig app, go to Settings > Configure and select Allow Manual Study Display (on by default for the Development environment)
- Open the developer console and run
Sprig('displaySurvey', SURVEY_ID);. The SURVEY_ID of a study can be found at the end of its URL (https://app.sprig.com/surveys/SURVEY_ID). - If the Sprig snippet is already installed on that page, your browser will display the study.
- If the questions are not rendering correctly or responses aren’t uploaded, check your browser console for any errors. You may have to work with your engineering and security teams to update your installation or CSP settings to resolve the errors.
After you have finished your testing, consider returning to Settings > Configure and select Disable Manual Study Display. This will prevent any other visitor from using displaySurvey in your environment.
Congratulations! Your installation is complete and you can begin deploying.
Updated 24 days ago